Identity Providers
To be able to use your own, non-Tapkey users (which are referred to as External Users), you may register your own, custom Identity Provider.
External Users are authenticated using JSON Web Tokens (JWT)1. A JWT contains information about the authenticated user and is signed by an Identity Provider. By checking the signature of that JWT, Tapkey can verify that a certain user is known to, verified and authenticated by the corresponding Identity Provider.
In order support authenticating external users, a system that is able to issue such JWTs may be registered as Identity Provider using the Tapkey Integrator Portal.
This page provides an overview of how to create an Identity Provider and register it with Tapkey.
Implementation Examples
There are many ways to implement an Identity Provider. In the end, it comes down to issuing signed JWTs to your authenticated users. How you choose to achieve that goal is completely up to you and likely depends on your needs and how authentication at your own service works.
The following sections demonstrate a few possible options.
Don't use the same JWT across different services
Make yourself familiar with best practices regarding authentication and authorization in general and with working with JWTs in particular. Getting this right is crucial in order to build a secure and reliable system. E.g. don't use the same JWT to authenticate against your own services, Tapkey or even other third-party services. To avoid excessive access between services, a dedicated JWT for each service with a different aud claim must be issued instead.
Using JWT-based Third-Party Services
There are many existing third-party, JWT-based authentication services like Firebase, Auth0 or Okta. These services can easily be set up to act as Identity Providers for Tapkey.
sequenceDiagram
    participant APP as Client App
    participant IP as Identity Provider
    participant TTS as Tapkey
Trust Service

    note over APP, TTS: Login user on behalf of an external service
    APP ->>+ IP: Login
    APP --> IP: Authentication flow
    IP -->>- APP: JWT

    note over APP, TTS: Exchange JWT for Tapkey Access Token
    APP ->>+ TTS: Exchange JWT
    TTS -->>- APP: Tapkey Access Token

    note over APP, TTS: Use Tapkey Access Token to authenticate API requests
    APP ->>+ TTS: Authenticated API requests
(using the Tapkey Access Token)
    TTS -->>- APP: Result
Custom Authentication
If you are already using some sort of authentication (like certain OICD2 flows) that already produces signed JWTs that are delivered to the authenticated client, you may want to extend your solution to produce and deliver JWTs that can be used with Tapkey. The expected format of the JWT payload format is documented in the next section.
If your third-party service uses a custom authentication flow (like cookies, session IDs, non-JWT-based Bearer Tokens etc.) to secure your services, you might need to extend it in order to issue signed JWTs to your authenticated users like in the following example.
sequenceDiagram
    participant APP as Client App
    participant IP as Third-Party
Service
    participant TTS as Tapkey Trust Services

    note over APP, TTS: Third-party service login
    APP ->>+IP: Login
    APP -> IP: Authentication flow
    IP -->>-APP: OK

    opt
    APP-->>+IP: Authenticated API calls
    IP-->>-APP: Result
    end

    note over APP, TTS: Issue JWT for Tapkey
    APP ->>+IP: Get JWT
    IP  ->>IP: Issue JWT
    IP  -->>-APP: JWT

    note over APP, TTS: Exchange JWT for Tapkey Access Token
    APP ->>+ TTS: Exchange JWT
    TTS -->>- APP: Tapkey Access Token

    note over APP, TTS: Use Tapkey Access Token to authenticate API requests
    APP ->>+ TTS: Authenticated API requests
(using the Tapkey Access Token)
    TTS -->>- APP: Result
JWT Payload Structure
The payload of a JWT consists of a set of claims. Tapkey expects the following claims to be present:
| claim | Pretty Name | Description |
|---|---|---|
aud | Audience | The audience of the identity provider as specified during registration. The audience describes for which service (in this case Tapkey) the token is intended for. Services which are not listening to this audience will not accept the token. This is useful when the same issuer has to issues tokens for different services. Read more |
iss | Issuer | The issuer of the identity provider as specified during registration. The issuer describes the service which has issued the token. Read more |
sub | Subject | An identifier representing the subject that this JWT is issued for. This will be used by Tapkey as the ipUserId. Read more |
iat | Issued At | Issued at timestamp. Read more |
exp | Expiration Time | Expiration timestamp. A typical value for exp is iat + 1 hour. After this timestamp, the token won't be accepted anymore. Read more |
http://tapkey.net/oauth/token_exchange/client_id | Token Exchange Client | Optional. In order to ensure that the JWT can only be exchanged for a certain, well known OAuth client, the optional field http://tapkey.net/oauth/token_exchange/client_id may be added. If this field is present, Tapkey will verify that the specified client id matches the client id specified in the corresponding /token request. |
| Custom identifier claim | Optional When an identifier should be used, this claim specifies the value that will be used as identifier. | |
| Custom identifier verified claim | Optional A claim which specifies whether the identifier has been verified by the user. The value must always be true, otherwise Tapkey will reject the token. |
The token must be signed using the RSA256 algorithm.
Maximum token lifetime
The token expiration (exp) is checked by Tapkey during the token exchange process. The token's lifetime must not exceed 25 hours at the moment of token exchange. In case the token expiration check fails, the token exchange request is rejected with 400 Bad Request.
Key Size
It is possible to choose an RSA key size of 2048, however, we recommend using 4096 bits. It is not possible to choose an RKA key size < 2048 or > 4096 at the moment.
The following examples shows a JWT used with the ipUserId approach:
{
  "aud": "Tapkey",
  "iss": "https://rental.example.com/",
  "http://tapkey.net/oauth/token_exchange/client_id": "123abc",
  "sub": "u1234234",
  "iat": 1516239000,
  "exp": 1516242600
}
The following examples shows a JWT used with the identifier approach:
{
  "aud": "Tapkey",
  "iss": "https://rental.example.com/",
  "http://tapkey.net/oauth/token_exchange/client_id": "123abc",
  "sub": "u1234234",
  "email": "user1@example.com",
  "email_verified": "true",
  "iat": 1516239000,
  "exp": 1516242600
}
Example of creating a JWT
This example shows how a JWT can be generated. There are libraries for issuing JWTs for all kinds of technology stacks. Please consider the following snippets as rough samples. For a reliable solution for your used technology stack, consult the documentation and the community for your specific stack.
!!! danger These examples are there to illustrate of the overall flow but should by no means be considered production-ready. A sound knowledge of authentication technologies and best practices is required in order to implement a proper authorization method.
Create Key pair
First of all to be able to sign and verify JWTs a key pair must be generated - a private key for signing the token and a matching public key for verifying the token.
Depending on your OS and tech stack, there are different crypto tools to create a key pair. For this example openssl - a broadly used crypto tool - is used.
Private Key
The following command creates a private key:
$ openssl genpkey -algorithm rsa -pkeyopt rsa_keygen_bits:4096 -out ip_key -aes256
The command will prompt for a passphrase to secure the key. Instead of stdin, any of the options documented in the Pass Phrase Options section in openssl(1) can be used. For the rest of this guide, 'strongpassphrase` is used as an example passphrase. Substitute it with your own, strong passphrase.
Info
It is possible to choose an RSA key size of 2048, however, we recommend using 4096 bits. It is not possible to choose an RKA key size < 2048 or > 4096 at the moment.
Danger
This private key is used to sign JWTs for your users. Store it securely and never share it. Anyone with this private key can impersonate themselves as any of your users.
Public Key
To extract the public key in a format that can be used with Tapkey, run
$ openssl rsa -in ip_key -pubout
which will print the public key in the following format:
-----BEGIN PUBLIC KEY-----
MIICIjANBgkqhkiG9w0BAQEFAAOCAg8AMIICCgKCAgEAv75dbVe+X84JfM0AwziA
   ...
bN26sbHb5Ekh8yHroawdK5cCAwEAAQ==
-----END PUBLIC KEY-----
This public key can be used to verify your issued JWTs. This public key needs to be specified when registering the Identity Provider, while the private key should never leave your systems and in particular shall never be sent to Tapkey.
Creating JWTs
The following code snippets are samples to create and sign a JWT using different technology stacks.
const fs = require('fs');
const jwt = require('jsonwebtoken');

const key = fs.readFileSync('ip_key');
const token = jwt.sign({
    "http://tapkey.net/oauth/token_exchange/client_id": "123abcd"
}, { key: key, passphrase: 'strongpassphrase' }, {
    algorithm: 'RS256',
    audience: 'your-audience',
    expiresIn: '1h',
    issuer: 'your-issuer',
    subject: 'userId'
});

console.log(token);
import io.jsonwebtoken.Jwts
import io.jsonwebtoken.security.Keys
import io.jsonwebtoken.SignatureAlgorithm
import java.util.*

fun main() {
    // Load your private key instead of this line
    val keyPair = Keys.keyPairFor(SignatureAlgorithm.RS256)

    val expiration = Calendar.getInstance()
    expiration.roll(Calendar.HOUR, 1)

    val jws = Jwts.builder()
        .setSubject("userId")
        .setAudience("your-audience")
        .setIssuer("your-issuer")
        .setIssuedAt(Date())
        .setExpiration(expiration.time)
        .addClaims(
            hashMapOf("http://tapkey.net/oauth/token_exchange/client_id" to "123abcd") as Map<String, Any>?
        )
        .signWith(keyPair.private, SignatureAlgorithm.RS256)
        .compact()

    println(jws)
}
import io.jsonwebtoken.Jwts
import io.jsonwebtoken.security.Keys
import io.jsonwebtoken.SignatureAlgorithm
import java.util.*

// Load your private key instead of this line
private final KeyPair keyPair = Keys.keyPairFor(SignatureAlgorithm.RS256);

Calendar expiration = Calendar.getInstance();
expiration.roll(Calendar.HOUR, 1);

String jws = Jwts.builder()

    .setSubject("userId")
    .setAudience("your-audience")
    .setIssuer("your-issuer")
    .setIssuedAt(Date())
    .setExpiration(expiration.getTime())
    .addClaims(new HashMap<String, Object>() {{
        put("http://tapkey.net/oauth/token_exchange/client_id", "123abcd");
    }})
    .signWith(keyPair.getPrivate(), SignatureAlgorithm.RS256)
    .compact();

System.out.println(jws);
Read/Debug JWTs
Tip
To debug JWTs you may use services like jwt.io that provide functionality to decode JWTs and validate their signature or even change token details.
Keep in mind that production tokens should be treated as sensitive information and must not be shared with anyone or posted to services lik jwt.io.
Share only decoded JWTs
As signed JWTs are used for authentication, they should be treated like passwords. Never share or log production JWTs.
If there is a reason to analyze a token, only share the unsigned and decoded payload of the JWT.
The listing below contains an exemplary JWT issued by an identity provider that can be used with the Token Exchange grant type.
eyJhbGciOiJSUzI1NiIsInR5cCI6IkpXVCJ9.eyJzdWIiOiJ1c2VySWQiLCJpc3MiOiJ5b3VyLWlzc3VlciIsImF1ZCI6InlvdXItYXVkaWVuY2UiLCJodHRwOi8vdGFwa2V5Lm5ldC9vYXV0aC90b2tlbl9leGNoYW5nZS9jbGllbnRfaWQiOiIxMjNhYmMiLCJpYXQiOjE1MTYyMzkwMDAsImV4cCI6MTUxNjI0MjYwMH0.lktBCBobTinSkpUutshjgJPHikH8KFlo-UafT7NJKCpQvoVgK5AU-1oGx2IgGmh-RfmeK4YaCNz0q8WjVg0qSAI1KlClbKV0sVPyJ3UWh3lqQQtaGjeKdWZ5nLqtbjFL4rQnXbFynuzyOyCWWGyvuXlcQpsnDnme-URP7yPZ8chd8OQwF5DYfpWTEoZUcycdhW5zcJN-LZBEKLv8e0XI8Hqovo5UkPq2NVPuwp2eF8r14jcgs0P_-CbQOn3s_SfcW5v2Z_IyHcgmPRC2xmFkORq1IsVWOCbgd81hS6tgm3HZVl91-XO_MuKkyoTlN6CdEIzcHMjBHDGZa9zPC_ZixdksHXW2InvEDvPxmqNlWFUOWLMTpfeaIZ-i3qzIto60Lk3QKrtJQst0bPF0IlHPM8ni6369wIZ8dQKW8s0xviJWBvRvO_P1VP9K5_uiYf7iySXpIpctFH8jjGMT5He95fZ309ldK1bTG9YCVtV8f0FpnwYo7NZucMC7oemayUtLdMa_A6JbX6yoHUVrHLXWDoDXJmvde7-h0r6tJUClGShypsn2rS8hrmBt7TGco2tA5We5IELnuy-zEgj5qD679i3HrBJQUenxrMYHiPTijZ-xUZ9AkZRe1ZUYhxU3Q4-5q6YNWoiGAC1FNe3KZEgfeI3DtkNupT-n0HdXTRCnjmo
The JWT above consists of a header
{
  "alg": "RS256",
  "typ": "JWT"
}
and a payload section
{
  "sub": "userId",
  "iss": "your-issuer",
  "aud": "your-audience",
  "http://tapkey.net/oauth/token_exchange/client_id": "123abc",
  "iat": 1516239000,
  "exp": 1516242600
}
and has a signature that can be verified using the following public key:
-----BEGIN PUBLIC KEY-----
MIICIjANBgkqhkiG9w0BAQEFAAOCAg8AMIICCgKCAgEAxWj/WgqR5UKY+j0yTIbI
wCAbPR7gyKLs01K9t1Ne4mpzwQmYbzaHExc6asSbYZZWK0682FYbgcgl7bYpD9Tv
8MchGtB7UG2t4veTX7/tiStbCWjyjZeFJJEUo5xB6FJ70RntK5dZ1x/ghmWVuOwG
A/gpnjY/4tsP/5uvuhNRFTq+6QCIUk41VfuNURfzQaNRskKKwaplq1Ixr57WlfpE
FZ8QCZJunb5Kx9+9kguq9fgGTBJJl6EHR38ZnPtcHFsjJpLNpuNyhKMgsyPHLUMw
IuJdrYEDeBwz2UFsdlv5LyXgYYiB4GWzsmd3GHngvprdEH3+qVECCVUl/sE5G91Y
i8yosqCG/fMXUxgh4Cd0qtjSSspMivI2pazKXg2V8kZa8zdkk/U6tDQod6Yx8QJA
i4b1JpkM084XjPp744CNUCgkXaMHXsxt2j8iNXzeOwjI8UmM7E2AHi7yW4hQ1RqS
TG7gRq/DNJO3SmOOXH0mylKoEj3V6Zux9N6O70wdh+r6jRRLMt7Onp4c+Yn8qo8U
6cYnoERNOjcpeTt95G0/nTTD37bWz0UQ5+APdyTfkqvv6ZXfUcH23l1dtd3L9/v7
DWQPxixayegv/fLRRoSITNFxiyFsrJO7XGzNekbGcUrLwlL7uppR/6PAbHCimr//
/b8ZiU8ZE/RPvifLOYryNpkCAwEAAQ==
-----END PUBLIC KEY-----
Registering a New Identity Provider
An Identity Provider can be registered via the Tapkey Integrator Portal in order to be used with Tapkey.
- Go to the Identity Providers page at the Tapkey Integrator Portal.
- Click on the plus button in the lower right corner.
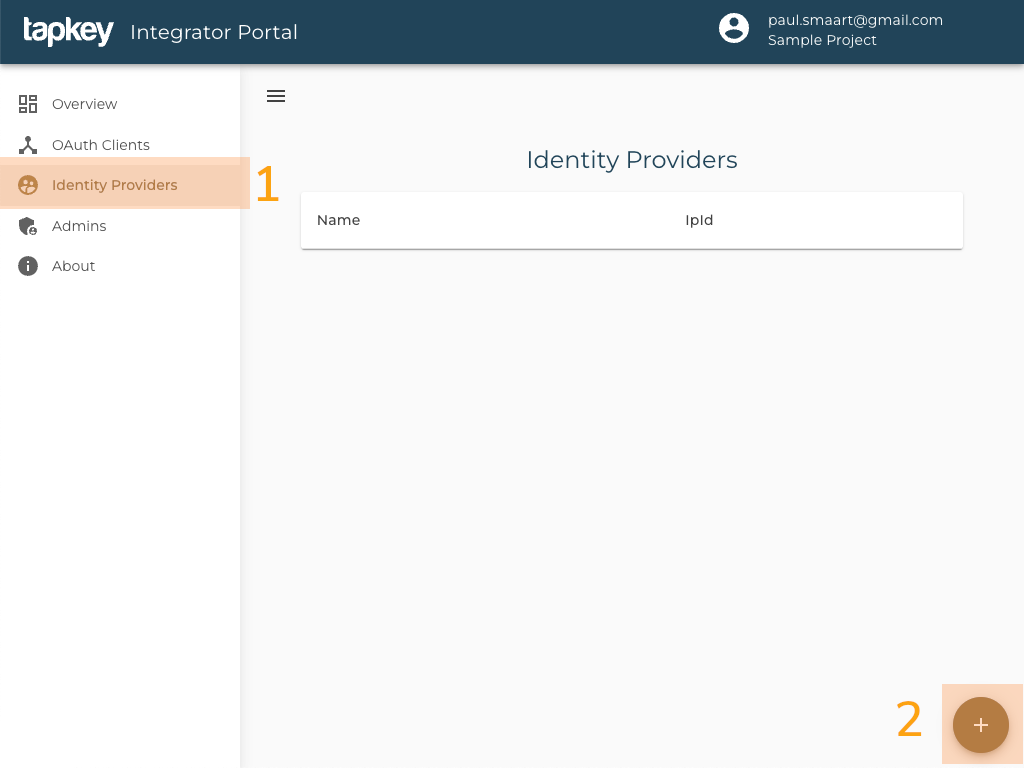
The following form for creating the Identity Provider will be displayed:
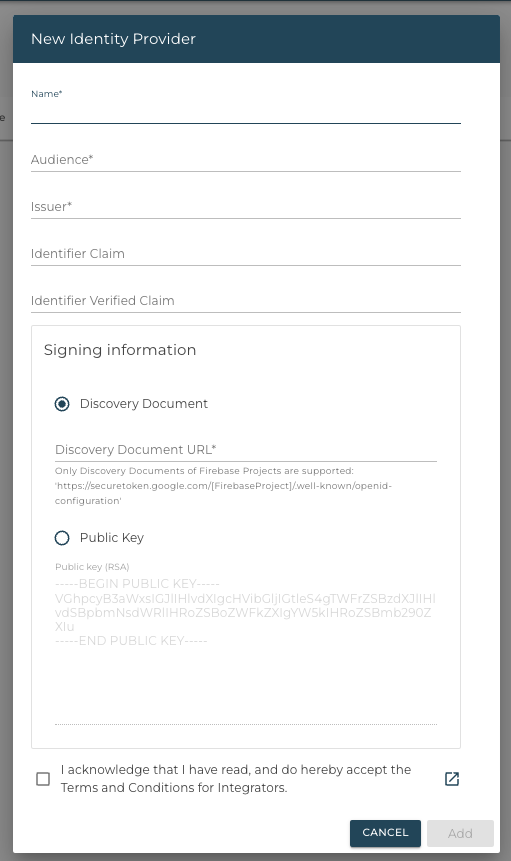
Name
The name of your Identity Provider. May be displayed to users.
Audience
The audience, as described here, defines the service (in this case Tapkey) the token is issued for. The value can be chosen freely and must match the aud claim of the issued tokens.
Issuer
The issuer, as described here, defines the service (in this case your Identity Provider) which signed the token. The value can be chosen freely and must match the iss claim of the issued tokens.
Identifier Claim
This optional field is used when the identifier instead of the ipUserId should be used to match external users. This field specifies the the name of the claim, which holds the identifier value.
Usually, this will be set to a standard claim like email or phone_number, but can be any arbitrary value.
If the identifier claim is specified, this claim must be present in the issued JWT. Otherwise, the token won't be accepted.
Identifier Verified Claim
If an Identifier Verified Claim is set, Tapkey will reject JWTs which do not contain this specified claim, or JWTs where the value of that claim is not true.
Some Identity Providers may already issue JWTs during a registration/sign-up process, even if a user's identity is not verified at that point.
For example, Firebase allows to sign up via email and password and issues a JWT immediately even before the user clicked on a verification link in the sent email. Such JWTs include a claim named email_verified holding a value of false, indicating that the email address has not been verified so far.
Warning
When using the identifier approach, it is crucial that Tapkey only uses identifiers that have been verified. Otherwise, it would be easy for attackers to impersonate legitimate users.
If Identifier Verified Claim is not defined, Tapkey will not verify this field. In this case it's crucial that the identity provider doesn't issue any JWTs for the given user, until the user's identity value has been verified.
Public Key
In order to verify the signature of your JWTs, the public key of your signing key is required.
Instructions on how to extract the public key from the private signing key can be found here.
Hint
Make sure that you paste the public key including the "-----BEGIN PUBLIC KEY-----" and "-----END PUBLIC KEY-----" parts.
Discovery Document
As an alternative to specifying a public key, an OpenID Connect discovery endpoint may be provided. The public key used to verify the JWTs' signatures will then be fetched from the discovery endpoint on a regular base.
At this time, only the Firebase discovery endpoint is supported. Other endpoints might be added as required upon request.
Signing Key Rollover
In order to gracefully replace signing keys with new ones, the Identity Provider registration form has a dedicated key rollover function.
-
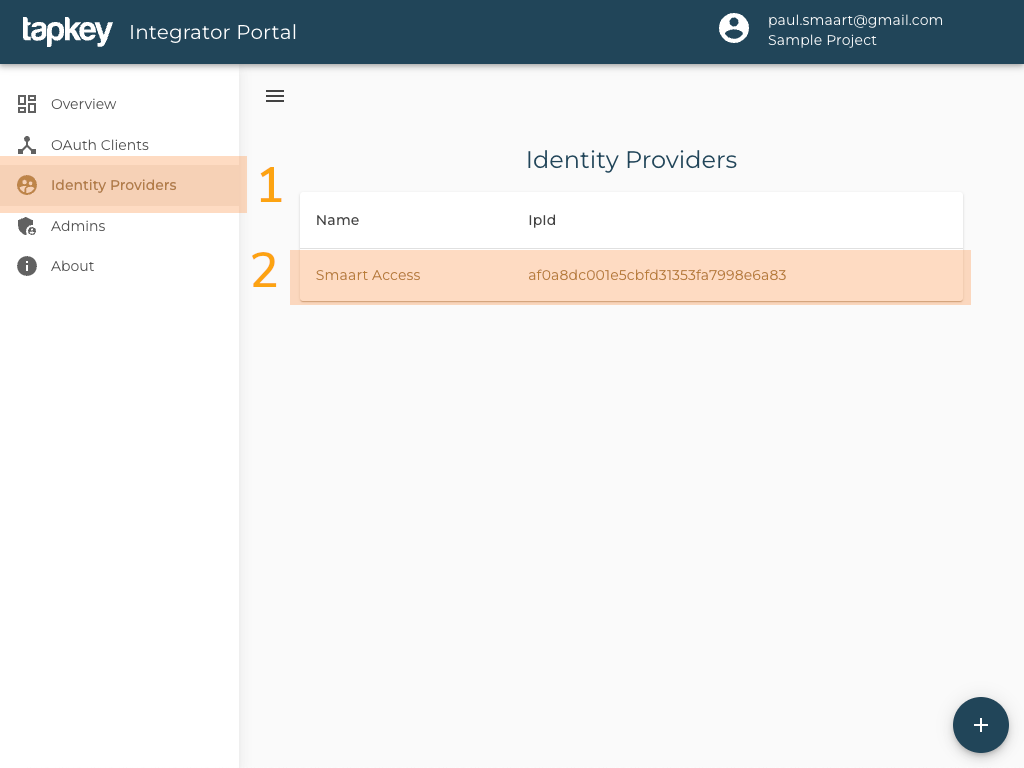
Go to the Identity Providers page at the Tapkey Integrator Portal.
Identity Provider Page of Integrator Portal -
Choose the Identity Provider from the list.
-
Click on the key rollover button below the list of public keys.
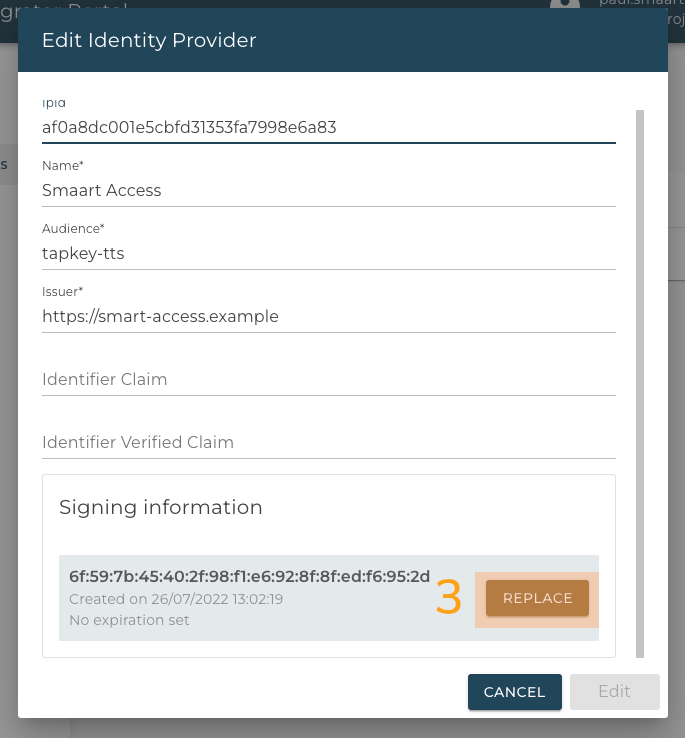
Configuration of Identity Provider 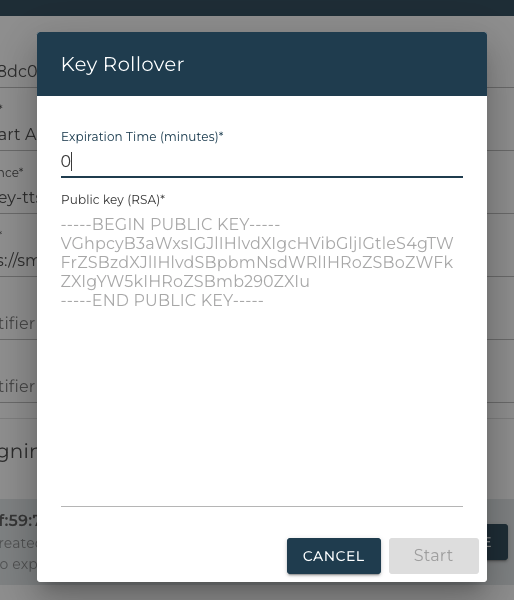
Key Rollover form
Expiration Time
Choose an expiration time in minutes for any previous keys. Any previous keys will stop working after that time.
Public Key
Enter the public key of the new key pair.